 Ring Studio
How Custom Rings Are Made: CAD, Wax and Casting
Most custom rings today are made the same way: a brief becomes a CAD model, the model is 3D printed in wax or castable resin, the print is cast in gold or platinum by the lost-wax process, then the jeweller cleans up the casting, sets the stones and polishes it. From approved design to finished ring usually takes three to six weeks.
On this page
- Stage 1: The brief
- Stage 2: Sketch and CAD render
- Stage 3: Wax or resin print
- Stage 4: Lost-wax casting
- Stage 5: Clean-up and assembly
- Stage 6: Stone setting
- Stage 7: Polishing, plating and finishing
- How long does each stage take?
- Where Ring Studio fits in the custom ring process
- What makes a well-made custom ring
- Main stages
- Brief, CAD, print, cast, clean-up, setting, polish, hallmark
- Typical make time
- 3-6 weeks after design approval
- Pattern material
- 3D printed castable wax or resin, or hand-carved wax
- Where Ring Studio fits
- Designing and sharing the brief, before CAD
Stage 1: The brief
Every ring starts as a conversation. The jeweller needs to know the centre stone (shape, size and type), the setting style, band style and width, metal, ring size, budget and deadline, plus any personal touches. Ambiguity at this stage causes most of the delays later, because the designer has to guess and then redo. Our guide to working with a jeweller on a custom ring includes a brief template.
If a specific stone is being used, it is usually sourced or measured now, because the whole design is built around its exact dimensions. A 1.5 ct oval from one cutter might be 9.0 x 6.5 mm and from another 9.6 x 6.2 mm, and the prongs and head must fit precisely.
Stage 2: Sketch and CAD render
Some jewellers begin with a hand sketch; most move quickly into CAD (computer-aided design). Jewellery CAD tools such as Rhino with the MatrixGold plug-in are common in the trade, and some designers use general 3D software. The CAD designer models every part to tenths of a millimetre: the head and prongs, gallery, shoulders, shank thickness, finger size and any pavé seats.
You'll usually receive photorealistic renders from several angles. This is the moment to check:
- Height of the stone above the finger (lower snags less; higher lets light in and leaves room for a band).
- How the band joins the setting, and whether a wedding band will sit flush.
- Band width and thickness. Under about 1.6-1.8 mm wide, a band can feel flimsy over years of wear.
- Prong size and placement over the stone's edges and points.
Revisions are cheap here and expensive later. Fees for CAD vary; see jewellery CAD design fees.
Stage 3: Wax or resin print
Once the CAD is approved, the file is sent to a high-resolution 3D printer that builds a pattern in castable wax or a castable resin designed to burn out cleanly. The print is a precise physical copy of the ring, complete with prongs and stone seats, though usually slightly oversized in places to allow for finishing.
Some jewellers offer the client a resin try-on model at this point. It's a good way to judge real-world proportions on the hand, especially for large stones or unusual shapes such as east-west settings.
Traditional hand carving is still used too. A skilled wax carver can produce organic, flowing forms, and for simple bands a jeweller may skip wax entirely and fabricate the ring from metal stock.
Stage 4: Lost-wax casting
Lost-wax casting has been used for thousands of years and remains the standard method for rings:
- The pattern is attached to a wax "sprue" (a channel) and often several patterns are attached to a central tree.
- The tree is placed in a flask and surrounded with investment, a fine plaster-like material.
- The flask goes into a kiln. The wax or resin melts and burns out, leaving a ring-shaped cavity.
- Molten metal is poured or forced in by vacuum or centrifugal casting. Platinum needs much higher temperatures than gold and is often handled by specialist casting houses.
- Once cool, the investment is broken away and the castings are cut from the tree.
A raw casting looks dull and rough with a sprue stub. It's the right shape, but far from finished.
Stage 5: Clean-up and assembly
The bench jeweller removes the sprue, files and sands every surface, and checks dimensions. Some designs are cast in parts (for example a head in a different colour from the band, as in a two-tone ring) and then laser-welded or soldered together. Sizing is adjusted if needed.
Stage 6: Stone setting
Setting is a specialist skill and often done by a dedicated setter. For a prong setting, the setter cuts small seats into each prong, places the stone, and bends the prongs over the girdle with precise pressure. A bezel is pushed or hammered evenly around the stone. Pavé stones are each set into drilled holes and secured with tiny beads of raised metal. Softer gems such as emerald (7.5-8 on the Mohs scale) need extra care during setting.
Stage 7: Polishing, plating and finishing
The ring is pre-polished before setting and given a final polish after. White gold is usually rhodium plated for a bright white finish (see rhodium plating explained). Satin or brushed finishes, engraving and any milgrain detail are added at this stage. In the UK, items above the weight thresholds are sent to an Assay Office for hallmarking before sale.
How long does each stage take?
| Stage | Typical time |
|---|---|
| Brief and stone sourcing | A few days to 2 weeks |
| CAD and revisions | 3-10 days |
| Printing and casting | 3-7 days |
| Clean-up, setting, polishing | 1-2 weeks |
| Hallmarking (UK) | Several days to 2 weeks |
| Total | Usually 4-8 weeks from first meeting |
Timelines stretch in the run-up to Christmas and Valentine's Day, and when a specific stone has to be found. Build in a margin.
Where Ring Studio fits in the custom ring process
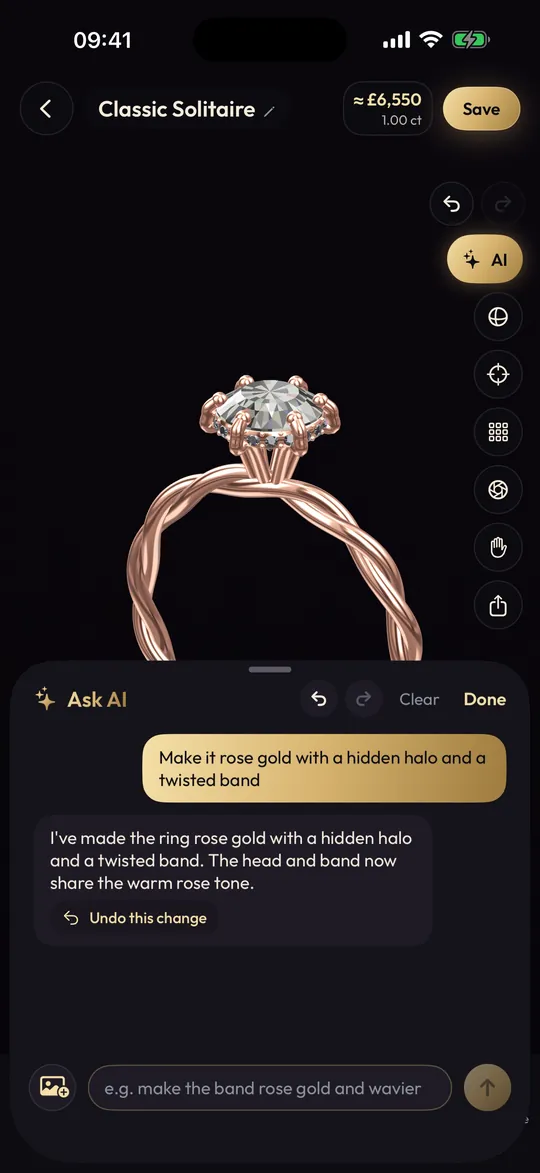
Ring Studio sits at the very start: the brief. It's a 3D ring design app for iPhone, iPad and Android that lets you design the ring you want before you ever sit down with a jeweller, so stage 1 is clear and stage 2 has fewer revisions.
- Build the ring in real-time 3D: stone shape and carat, setting and prong tips, halo, gallery, side stones, band style and width, metal.
- Or describe it to the AI designer, or show it a photo of a ring you love, and refine the result by chatting.
- Check the proportions on your own hand with live try-on (Pro).
- Share a ring code (Pro) so your jeweller opens the exact design in Ring Studio, or send screenshots.
What it doesn't do is replace manufacturing CAD. It doesn't export STL or 3DM files; the jeweller's CAD designer rebuilds the design to your stone's true measurements and casting tolerances. Our Ring Studio vs jewellery CAD comparison explains the difference, and ring design without CAD skills shows the app in more detail.
What makes a well-made custom ring
- Enough metal. Thin shanks and tiny prongs cut cost but wear out faster.
- Clean casting. No porosity (tiny pits) visible under a loupe, especially on the inside of the band.
- Even prongs. Same size, smooth tips, not catching on fabric.
- Level stone. The table sits flat and centred when viewed from the side and top.
- Comfortable fit. Inside edges gently rounded; the ring doesn't tip to one side.
For costs, see how much a custom engagement ring costs.
Frequently asked questions
Are custom rings 3D printed?
The pattern usually is: a castable wax or resin model is 3D printed from the CAD file. The metal ring itself is then cast from that pattern, not printed directly, in most workshops.
What is lost-wax casting?
The wax or resin model is encased in plaster-like investment, heated so the wax burns out, and molten metal is poured or spun into the hollow it leaves. The mould is broken away to reveal a metal copy of the model.
How long does it take to make a custom engagement ring?
Around three to six weeks after the design is approved is typical, with design and stone sourcing adding one to three weeks before that. Busy seasons take longer.
Are all rings made with CAD?
No. Some jewellers still hand-carve wax models or fabricate rings by hand from wire and sheet metal, which suits some designs better. CAD is simply the most common route for engagement rings now.
Can I see my ring before it is cast?
Usually yes. Most jewellers send CAD renders, and some offer a printed resin model you can try on to check proportions before the metal is cast.